TL;DR: You can use the Notion API to automatically add rows to any Notion database from external sources (forms, quizzes, lead capture tools) without writing a single line of code. Pabbly Connect acts as the bridge between your form provider and Notion, and the entire setup takes under 15 minutes.
I manage all my content planning inside Notion. Articles, video ideas, community requests, everything sits in Notion databases. But manually copying form responses into those databases? That got old fast.
So I built a simple automation: whenever someone submits a form on my site (a content idea request, a lead capture form, a quiz response), that data flows directly into my Notion database. No copy-pasting. No switching tabs. No missed entries.
The tool that makes this work is Pabbly Connect, a one-time-purchase automation platform that connects your form provider to Notion through the Notion API. I picked Pabbly over Zapier for one reason: Pabbly charges a one-time fee while Zapier charges monthly, and Pabbly does not count internal tasks toward your credits.
In this tutorial, I will walk you through the exact setup I use, step by step, with screenshots from the actual process. By the end, you will have a working automation that sends form responses straight into your Notion database.
What You Need Before You Start
Before we get into the setup, here is what you need:
- A Notion account (free plan works fine)
- A form provider that supports webhooks (NativeForms, Typeform, Gravity Forms, WPForms, or any tool with webhook support)
- Pabbly Connect (the automation bridge between your form and Notion)
You do not need any coding experience. You do not need to understand APIs or JSON. The entire process is point-and-click.
How the Notion API Automation Works
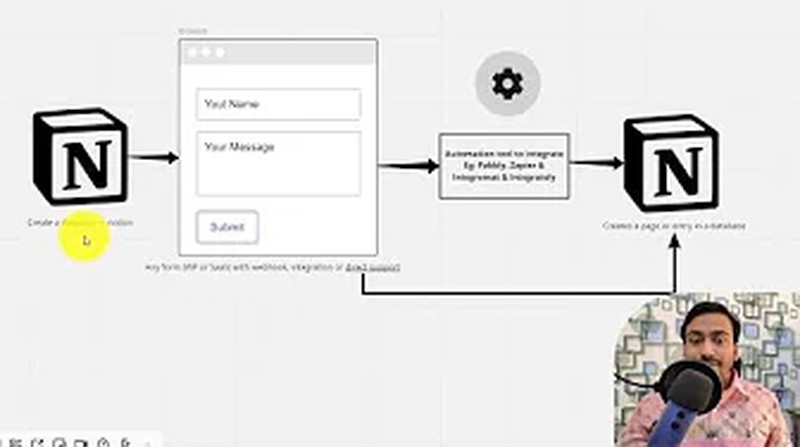
Let me break down what happens behind the scenes so you understand the full picture before we start building.
There are three layers to this automation:
Layer 1: Your Notion Database. This is where the data ends up. You create a table with columns that match the data you want to collect (name, email, message, whatever you need).
Layer 2: Your Form Provider. This is where users submit data. It can be a contact form on your WordPress site, a Typeform survey, a NativeForms embed, a quiz plugin, or anything that collects user input. The key requirement is that your form provider supports webhooks, which is a way to send data to an external URL whenever a form submission happens.
Layer 3: The Automation Bridge (Pabbly Connect). This sits between the form and Notion. Pabbly receives the webhook data from your form, then uses the Notion API to create a new row in your database with that data.
Here is the flow in plain English:
- A visitor fills out your form and hits submit
- Your form provider sends the response data to a Pabbly Connect webhook URL
- Pabbly Connect receives that data and creates a new page (row) in your Notion database
- The new entry appears in Notion within seconds, automatically
The beauty of this setup is that it works with almost any form provider. If your tool supports webhooks or has a direct Pabbly integration, you can connect it to Notion.
Why Pabbly Connect Over Zapier or Make?
There are several automation tools that can do this job. Zapier, Make (formerly Integromat), Integrately, and Microsoft Power Automate all support Notion integrations. So why Pabbly?
| Feature | Pabbly Connect | Zapier | Make |
|---|---|---|---|
| Pricing model | One-time payment (lifetime deal available) | Monthly subscription ($19.99+/month) | Monthly subscription ($9+/month) |
| Internal task counting | Does not count internal tasks | Counts every task | Counts every operation |
| Notion support | Yes (Create Page, Update Page) | Yes | Yes |
| Webhook trigger | Yes (free) | Yes | Yes |
| Best for | Budget-conscious users who want to pay once | Teams needing 5,000+ integrations | Advanced users needing complex logic |
I have been using Pabbly Connect for over three years now. The one-time pricing saves serious money if you run multiple automations. Zapier would cost me $240+/year for the same workflows I run on Pabbly for a one-time payment. For a simple form-to-Notion automation, Pabbly is more than enough.
That said, if your company already pays for Zapier or Make, you can follow the same logic with those tools. The Notion API side works the same regardless of which automation platform you choose.
If you are looking for more automation tools and lifetime deals, check out my active SEO lifetime deals page where I track the best one-time-purchase software.
Step 1: Create Your Notion Database
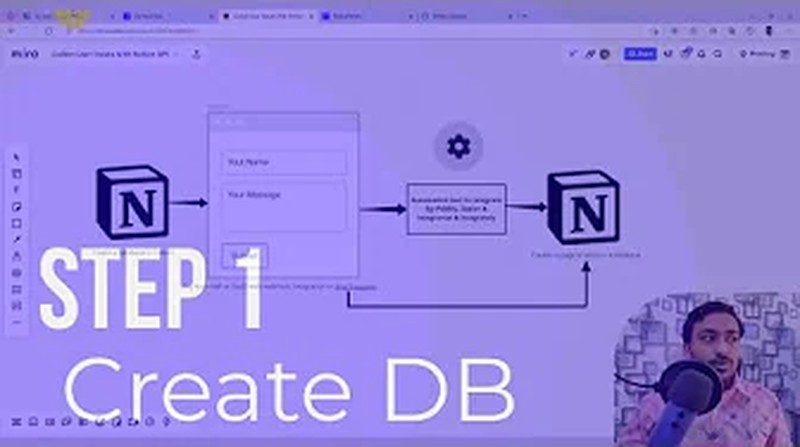
First, you need a Notion database (table) where the form data will land.
- Open Notion and navigate to the page where you want the database
- Create a new page (I named mine “Video Page” for this tutorial, but name it whatever makes sense for your use case)
- Add a Table database to the page
Now, add columns that match the data you plan to collect from your form. For my content idea form, I created three columns:
- Name (Title property, this is the default first column in Notion)
- Email (Email property type)
- Content Idea (Text property type)
Important: The column names in your Notion database do not need to match your form field names exactly. You will map them later in Pabbly Connect. But keeping them similar makes the mapping step easier and reduces confusion.
You can add as many columns as you need. Date fields, select dropdowns, checkboxes, URLs, phone numbers, Notion supports them all. Just make sure the property type in Notion matches the data type from your form. For example, do not use a “Number” property for a field that collects text input.
Step 2: Create Your Form

Next, you need a form to collect user responses. I use NativeForms because it creates clean HTML forms with webhook support, but you can use any form tool you prefer:
- WordPress plugins: WPForms, Gravity Forms, Fluent Forms, Formidable Forms
- Standalone form builders: Typeform, Tally, JotForm, Google Forms (with add-ons)
- Quiz tools: Any quiz plugin that supports webhooks
- Landing page builders: Most landing page tools have form builders with webhook support
For this tutorial, I created a simple form with three fields:
- Name (text field)
- Email (email field)
- Content Idea (textarea field)
The fields on your form should match the type of data you want to collect. If you are building a lead capture form, you might want name, email, company, and phone number. If you are building a content request form like mine, you might want name, email, and a message field.
Pro tip: Whatever fields you create in your form, create matching columns in your Notion database from Step 1. This makes the mapping step in Pabbly Connect much smoother.
Step 3: Set Up the Webhook URL
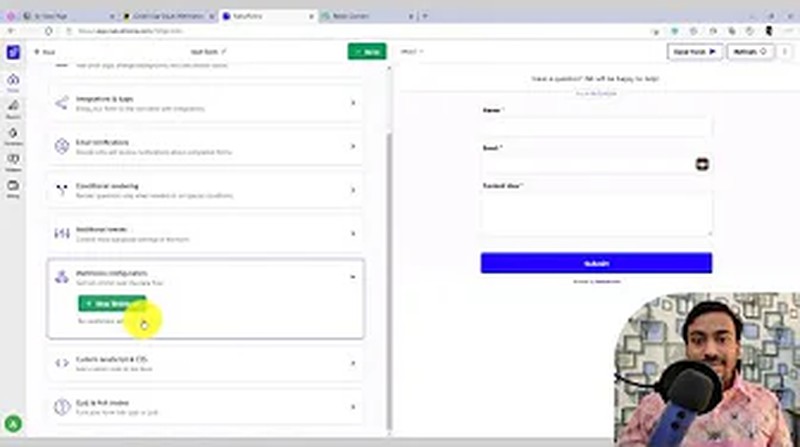
This is where the magic starts. A webhook is simply a URL that receives data when an event happens (in this case, when someone submits your form).
Some form providers have a direct Notion integration built in. If yours does, you can skip the webhook step and connect directly. But most form tools do not have native Notion support, which is why we need the webhook approach through Pabbly Connect.
Here is how to set up the webhook:
- Log into Pabbly Connect and create a new workflow
- For the trigger, select “Webhook” (it is usually the most popular option and shows at the top)
- Pabbly will generate a unique webhook URL for you. Copy this URL.
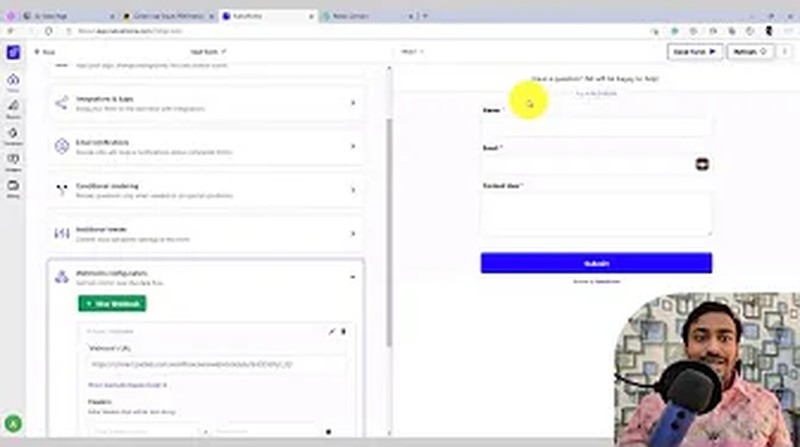
- Go back to your form provider and find the webhook settings (the location varies by tool, but it is usually under “Integrations,” “Notifications,” or “Webhooks”)
- Paste the Pabbly webhook URL
- Set the trigger event to “Form Completed” or “Form Submitted” (the exact wording depends on your form tool)
Now Pabbly Connect will start listening for form submissions. But it does not know the structure of your data yet. We need to send a test submission.
Step 4: Send a Test Form Submission
With Pabbly Connect waiting for a webhook response (you will see a “Waiting for webhook response” message), go to your form and submit a test entry.
Fill in dummy data:
- Name: Test User
- Email: test@example.com
- Content Idea: This is a test submission
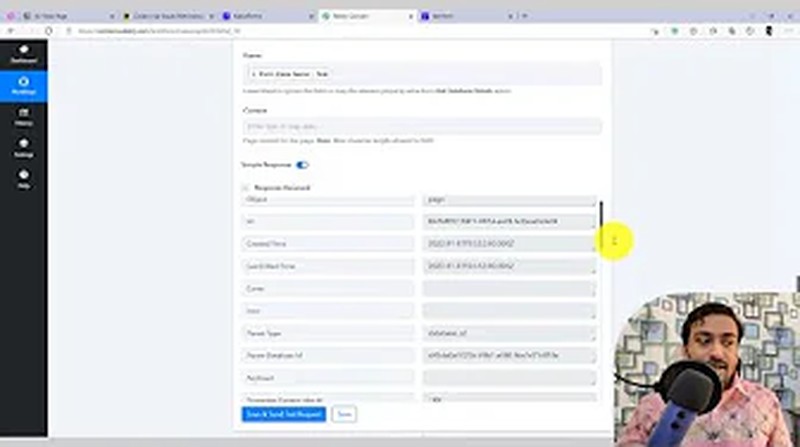
Click submit. Within a few seconds, Pabbly Connect should capture the test data and display it in the workflow editor.
You will see all the form fields listed with their values. This confirms two things:
- Your webhook is working correctly
- Pabbly knows the structure of your form data
If Pabbly does not receive the data, double check that you pasted the correct webhook URL and that you selected the right trigger event in your form provider.
Step 5: Connect Notion to Pabbly Connect

Now we connect the other end of the pipeline. This is where you tell Pabbly to create entries in your Notion database.
- In your Pabbly Connect workflow, click on the second step (the action step)
- Search for “Notion” in the app list and select it
- For the action event, choose “Create a Page” (in Notion, every row in a database is technically a “page”)
- Click Connect to link your Notion account
If this is your first time connecting Notion to Pabbly, click “Add New Connection.” Pabbly will show you step-by-step instructions to generate a Notion API token (also called an integration token). The process is straightforward:
- Go to notion.so/my-integrations
- Click “New Integration”
- Name it “Pabbly Connect” (or whatever you prefer)
- Copy the integration token
- Paste it into Pabbly Connect
This is a one-time setup. Once connected, you will not need to do it again for future Notion automations.
Grant Pabbly Access to Your Database
This is a step many people miss and it causes the most confusion. After connecting your Notion account in Pabbly, you need to explicitly share your Notion database with the Pabbly integration.
- Go to your Notion database (the one you created in Step 1)
- Click the Share button in the top right corner
- Click “Invite” and search for your Pabbly Connect integration
- Select it and click Invite
If you skip this step, Pabbly will connect to Notion successfully but will not see your database in the dropdown list. This is the most common error people run into.
Step 6: Map Form Fields to Notion Columns
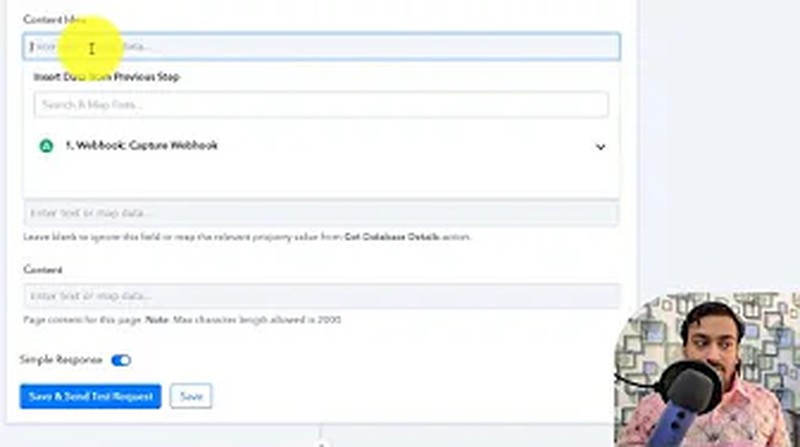
With Notion connected and your database shared, Pabbly will automatically pull in all the columns from your Notion database.
- In the Pabbly action step, select your Notion database from the dropdown
- You will see all the Notion columns listed (Name, Email, Content Idea, in my case)
- For each column, click the dropdown and select the corresponding form field from the webhook data
For example:
- Name column maps to the “Name” field from the webhook response
- Email column maps to the “Email” field from the webhook response
- Content Idea column maps to the “Content Idea” field from the webhook response
These are dynamic fields, which means every time a new form submission comes through, the values will automatically adjust based on what each user entered.
You can also add content to the Notion page body (not just the database columns). If you want the full form submission text to appear inside the Notion page itself, you can map fields to the page content area as well. I skip this for my use case because the database columns capture everything I need.
Step 7: Test the Full Automation
Before you go live, run one final test to make sure everything works end to end.
- Click “Save & Send Test Request” in Pabbly Connect
- If Pabbly returns a success message, the test data should appear in your Notion database
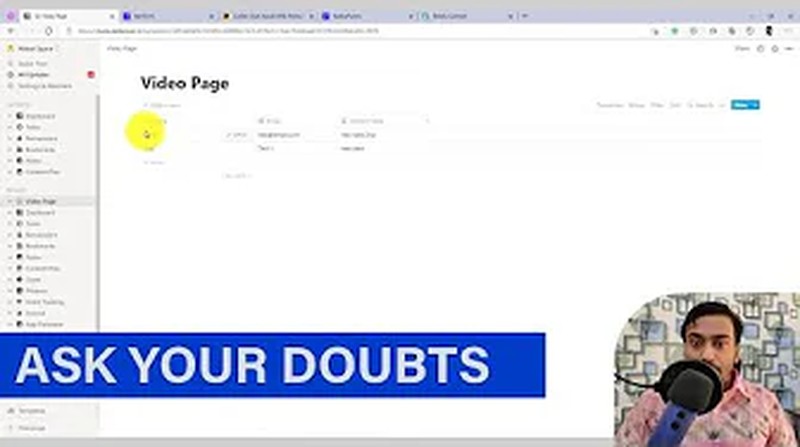
Go to your Notion database and refresh the page. You should see a new row with the test data you submitted earlier. If it is there, the automation is working.
Now let me do a full end-to-end test. I go back to my form, fill in new data:
- Name: Test Two
- Email: test2@email.com
- Content Idea: Second test idea
I click submit. Within seconds, a new row appears in my Notion database with exactly the data I submitted. No manual entry. No delays. Just automatic data flow.
That is the entire setup. From this point on, every form submission on your site will automatically create a new row in your Notion database.
Real Use Cases for This Automation
This form-to-Notion workflow is flexible. Here are practical ways I have seen people use it:
Content idea collection. I use this exact setup to collect content suggestions from my community. When someone submits an idea through my form, it lands directly in my Notion content calendar. No manual data entry.
Lead capture and CRM. Small business owners use this to build a lightweight CRM inside Notion. Form submissions from your website (name, email, phone, company) flow into a Notion database where you can track follow-ups, add notes, and manage the sales pipeline.
Event registration. If you run webinars or workshops, connect your registration form to a Notion database. Every registrant shows up automatically, and you can add status columns (registered, attended, no-show) to manage the event.
Client onboarding forms. Freelancers and agencies collect onboarding information through forms. Those responses flow into a Notion project database where each client has their own row with all the details filled in.
Survey and feedback collection. After a product launch or course completion, send a feedback form. Responses populate a Notion table for easy review and analysis.
The pattern is the same for all of these: create the Notion database, build the form, connect them through Pabbly, and map the fields.
Setting up automations like these is part of building efficient digital marketing workflows. The less time you spend on manual data entry, the more time you have for work that moves the needle.
Troubleshooting Common Issues
If your automation is not working, check these common problems first:
Pabbly Does Not Show My Notion Database
This happens when you have not shared the database with the Pabbly integration in Notion. Go to your database, click Share, and invite the Pabbly Connect integration. Then refresh the database list in Pabbly.
Form Submissions Are Not Reaching Pabbly
Double check that the webhook URL is correct and the trigger event is set to “Form Completed” (not “Form Started” or some other event). Also make sure your form actually sends a test submission, many form builders have a preview mode that does not trigger webhooks.
Data Appears in Wrong Notion Columns
Re-check your field mapping in Step 6. It is easy to accidentally map the email field to the name column and vice versa. The test data displayed in Pabbly should show you exactly which field contains which value.
Property Type Mismatch
If Notion rejects the data, it might be a property type mismatch. For example, if your Notion column is set to “Number” but the form sends text, the automation will fail. Make sure the Notion property types match what your form collects.
Webhook Stops Working After a While
If you are on Pabbly Connect’s free plan, there are limits on the number of tasks per month. If you hit the limit, webhooks will stop processing. Upgrade to a paid plan or wait for the monthly reset.
Alternatives to Pabbly Connect
If Pabbly Connect is not the right fit for your setup, here are alternatives that support Notion integrations:
- Zapier - The most popular automation tool. More expensive (starts at $19.99/month) but supports 5,000+ apps. Best if your company already uses it.
- Make (formerly Integromat) - More powerful than Pabbly for complex workflows. Good if you need conditional logic and branching. Starts at $9/month.
- n8n - Open-source and self-hosted option. Free if you run it on your own server. Good for developers who want full control.
- Microsoft Power Automate - Included with Microsoft 365. Good if your organization already uses the Microsoft ecosystem.
For most people building simple form-to-Notion automations, Pabbly Connect offers the best value because of the one-time pricing model. But any of these tools will get the job done.
I review automation tools and no-code workflows regularly. Check the best SEO tools page for my current recommendations across all categories.
Frequently Asked Questions
Is the Notion API Free to Use?
Yes. The Notion API is free for all Notion users, including those on the free plan. You can create integrations and use the API to read and write data without paying anything extra. The only cost is the automation tool (Pabbly Connect, Zapier, etc.) that connects to the API.
Can I Use Google Forms Instead of NativeForms?
Google Forms does not natively support webhooks, but you can use a Google Sheets add-on or a Google Apps Script to send data to a webhook URL. Alternatively, connect Google Forms to Pabbly Connect directly using Pabbly’s built-in Google Forms trigger (no webhook needed).
How Many Rows Can I Add to a Notion Database?
Notion does not impose a hard limit on the number of rows in a database. However, performance starts to slow down noticeably around 10,000 rows. For most form collection use cases, you will never hit this limit.
Does This Work With WordPress Contact Forms?
Yes. Any WordPress form plugin that supports webhooks works with this method. WPForms, Gravity Forms, Fluent Forms, and Formidable Forms all have webhook capabilities. Some also have direct Pabbly Connect integrations through the Pabbly app directory.
Can I Update Existing Notion Rows Instead of Creating New Ones?
Yes. Pabbly Connect supports the “Update Page” action for Notion, which lets you modify existing entries. This is useful for workflows where a user updates their information and you want to reflect the changes in the same Notion row instead of creating a duplicate.
What Happens If Pabbly Connect Goes Down?
If Pabbly Connect is temporarily unavailable, form submissions will not reach Notion. However, most form providers store submissions locally, so you will not lose data. When Pabbly comes back online, you can manually re-trigger missed entries or set up error handling in your workflow.
Wrapping Up
Connecting external forms to your Notion database through Pabbly Connect is one of those automations that takes 15 minutes to set up and saves hours over time. I set mine up three years ago for content idea collection, and it still runs without any maintenance.
The key steps: create your Notion database, build your form, grab the Pabbly webhook URL, send a test submission, connect Notion, map the fields, and test. That is the entire process.
If you want to see this process in action with real screenshots, watch the full video tutorial at the top of this post. And for more productivity workflows and tool reviews, subscribe to my newsletter where I share honest automation tips every week.
