TL;DR: Buying a domain on Namecheap takes less than 10 minutes. Create a free account, search for your domain name, remove the upsells at checkout, apply a promo code, and pay via PayPal, debit card, or Bitcoin. This guide covers every step with screenshots so you do not make a mistake that costs you later.
I have bought over 100 domain names across my SEO and digital marketing career. I have used GoDaddy, Namecheap, Porkbun, and a handful of others. Namecheap is where I keep coming back. The pricing is fair, the dashboard is clean, and their support team actually responds.
This tutorial shows you exactly how to register a domain on Namecheap, from creating your account to receiving your order confirmation. I recorded a video version of this as well, which you can watch below or read the written guide for a step-by-step breakdown with screenshots.
Whether you are building your first website, setting up a blog, or registering a domain for a client, this guide covers everything you need to know, including how to avoid the upsells that catch most beginners off guard.
Why I Recommend Namecheap for Domain Registration
Namecheap is one of the most popular domain registrars on the internet, and for good reason.
The prices are competitive. A standard.com domain starts at around $10 to $14 per year, and they frequently run discount sales where you can get your first domain for as low as $5 to $7. I bought ten domains in a single day recently during one of their promotions, all under $8 each for the first year.
The dashboard is straightforward. You do not need any technical knowledge to manage your domains, set up DNS records, or transfer ownership. Everything is clearly labeled.
They include free WHOIS privacy protection on all eligible domains. That is a feature many registrars charge extra for, sometimes $10 to $15 per year. Namecheap includes it at no extra cost, which keeps your personal contact details out of the public domain registry.
If you want to compare Namecheap against other domain registrars before committing, check my detailed breakdown of the best domain registrars based on 250+ community votes.
What You Need Before You Start
Before you buy a domain, have these three things ready:
- A domain name idea (or a few options in case your first choice is taken)
- An email address you actively check (Namecheap sends your confirmation and future renewal notices here)
- A payment method: debit card, PayPal, or Bitcoin
That is it. You do not need to set up hosting first. You do not need a business registration or any special documentation. Domain registration is open to anyone.
One thing worth understanding before you search: a domain name is just your web address (for example, alstonantony.com). Buying a domain does not give you a website. It gives you the right to use that address. You still need hosting to put a website on it. But getting the domain first is the right move, especially if you have a specific name in mind.
Step 1: Create Your Namecheap Account
Go to [namecheap.com](https://www. namecheap.com) and click the Sign Up button in the top navigation.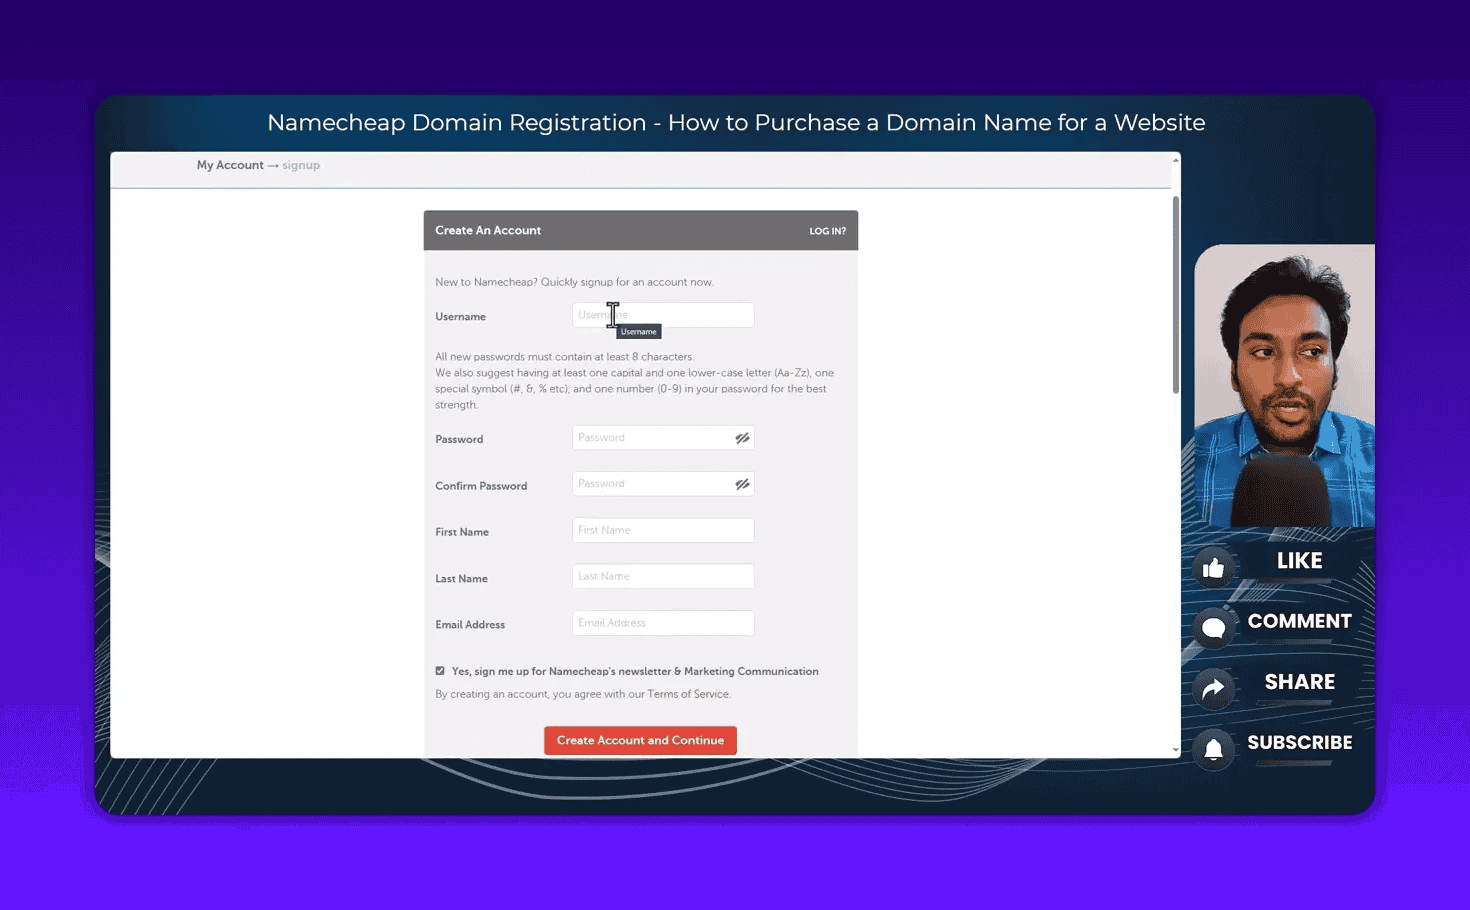
The signup form asks for:
- A unique username (this is your login ID, not your display name)
- A password (use a strong one, ideally from a password manager)
- Your first and last name
- Your email address
After you fill in the form and click Create Account, Namecheap sends a confirmation email to the address you provided. Click the confirmation link in that email before you try to log in.
I personally recommend creating your account before you start searching for domain names. Some people skip this step, search for a domain, and then try to complete the purchase only to get interrupted by the signup process mid-checkout. Set up your account first, then search. It takes two minutes and makes the purchase process smoother.
You can also enable two-factor authentication (2FA) on your Namecheap account from the Security settings. I recommend doing this. Domain names are valuable digital assets. If someone gets access to your registrar account, they can transfer your domains away from you.
Step 2: Search for Your Domain Name
Once you are logged in, you will see the domain search bar right on the Namecheap homepage. You can also access it by clicking Domains in the top navigation and selecting Domain Name Search.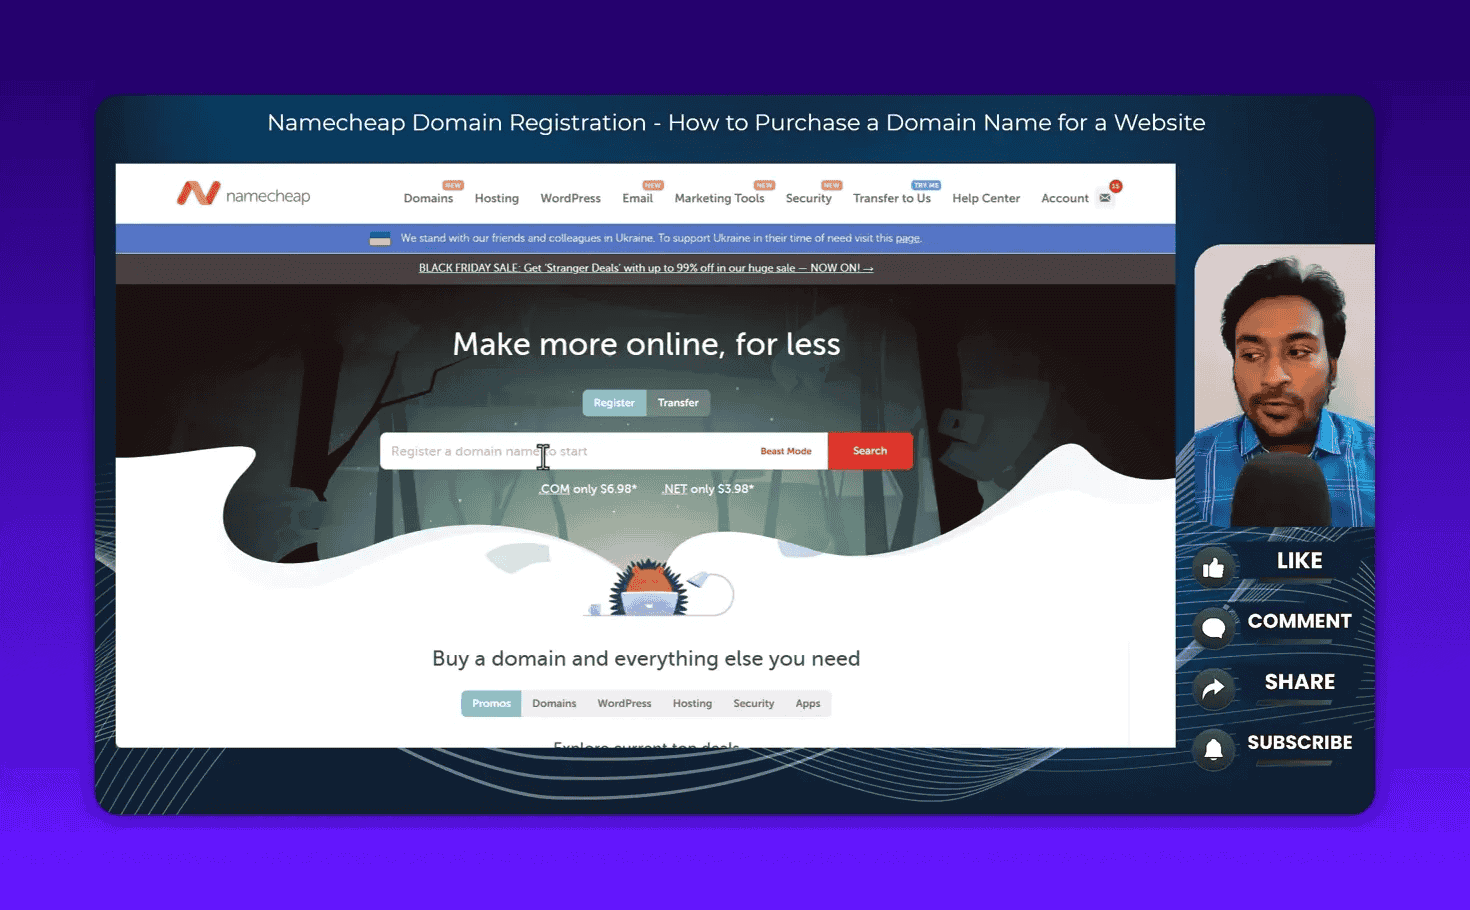
Type the domain name you want to check. For example, if you want weightloss.com, type weightloss or weightloss.com into the search box and press Search.
Namecheap prioritizes the.com result and shows you its availability status immediately.
If the domain shows a green checkmark and Add to Cart button: The domain is available and you can purchase it.
If the domain shows a greyed-out “Taken” label: Someone already owns that domain. You cannot register it through the normal process.
A few important tips at this stage:
Triple-check the spelling before you add anything to your cart. I have seen people register marketng.com instead of marketing.com. Once you buy a domain, you own it for the year. There is no refund for a typo. Spell it out letter by letter before clicking Add to Cart.
You can also search with a specific extension. If you only want to check .net availability, type weightloss.net in the search box. Namecheap will focus on that extension first.
Step 3: What to Do When Your Domain Is Taken
Most short, memorable.com domain names are already registered. This is especially true for common English words and popular niches.
When a domain is taken, Namecheap shows you a Make Offer option. This connects you to their domain broker service. They contact the current owner on your behalf and try to negotiate a purchase. This process can work but it typically requires a significant budget. Premium domains change hands for thousands or even millions of dollars. Unless you have a specific strategic reason to acquire a particular domain, I would not go down this path as a first-time buyer.
The smarter approach is to find a different name. I cover three ways to do this in the sections below: manual searching, the Domain Generator, and Beast Mode.
Step 4: Understanding Domain Extensions
The extension is the part after the dot. .com is the most well-known, but there are now over 400 domain extensions available.
Here is a practical breakdown of the ones you are most likely to consider:
.comis the default choice for most websites. If you can get the.com version of your desired name, get it..netand.orgare established alternatives. Slightly less trust authority in user perception, but perfectly fine for most sites..aihas become popular for technology and artificial intelligence products..iois common among tech startups.- Country extensions (
.infor India,.co.ukfor the UK,.lkfor Sri Lanka) make sense if your audience is primarily in one specific country.
Namecheap lets you filter extensions by category: popular, international, business, education, and more. You can also filter by price if budget is a concern. I have found solid domain names for under $2 per year this way, especially in less competitive niches.
Step 5: Premium vs Standard Domain Pricing
When you search for a domain and see results with prices like $2,000/year or $1.5 million/year, those are premium domains.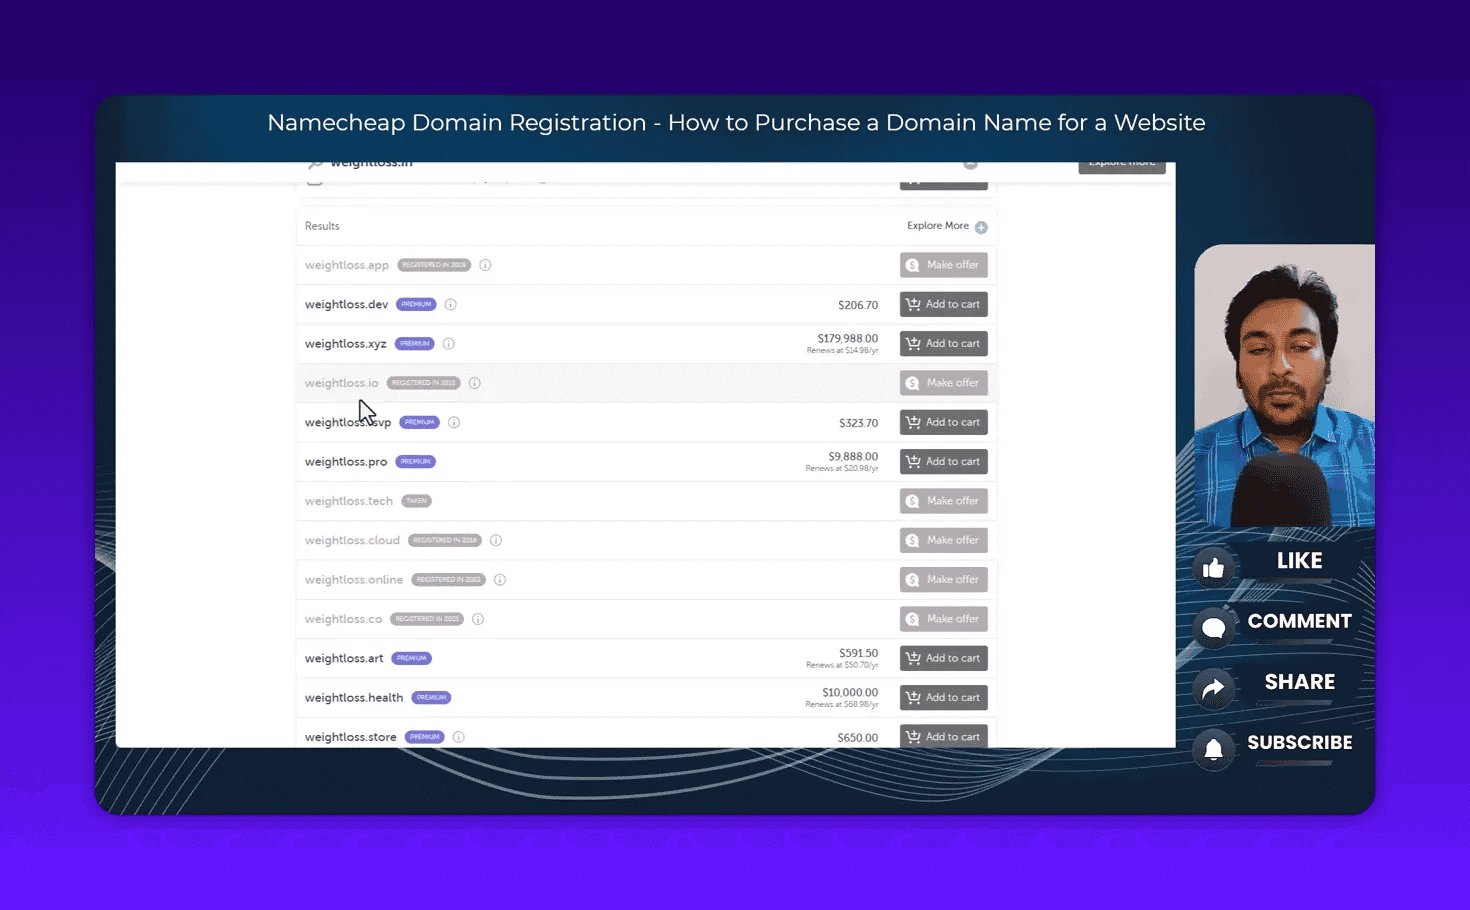
A premium domain is one that a registry or current owner has flagged as high-value, often due to the commercial value of the keywords in the name. insurance.com is a classic example. The domain name alone has been sold for tens of millions of dollars.
For most people building a website or blog for the first time, premium domains are not worth it. The SEO benefit of a keyword-rich domain is minimal in 2026. Google evaluates hundreds of signals beyond your domain name. What matters more is the content you publish, the authority you build, and the technical health of your site. For a full breakdown of how search engines evaluate your site, read how search engines work.
Stick to standard domains. A good brand name that is available for $10 to $15 per year will serve you far better than spending $3,000 on a keyword domain.
Step 6: Use the Domain Generator to Find Name Ideas
If you are struggling to find a domain name that is available and affordable, Namecheap’s Domain Generator is a useful tool.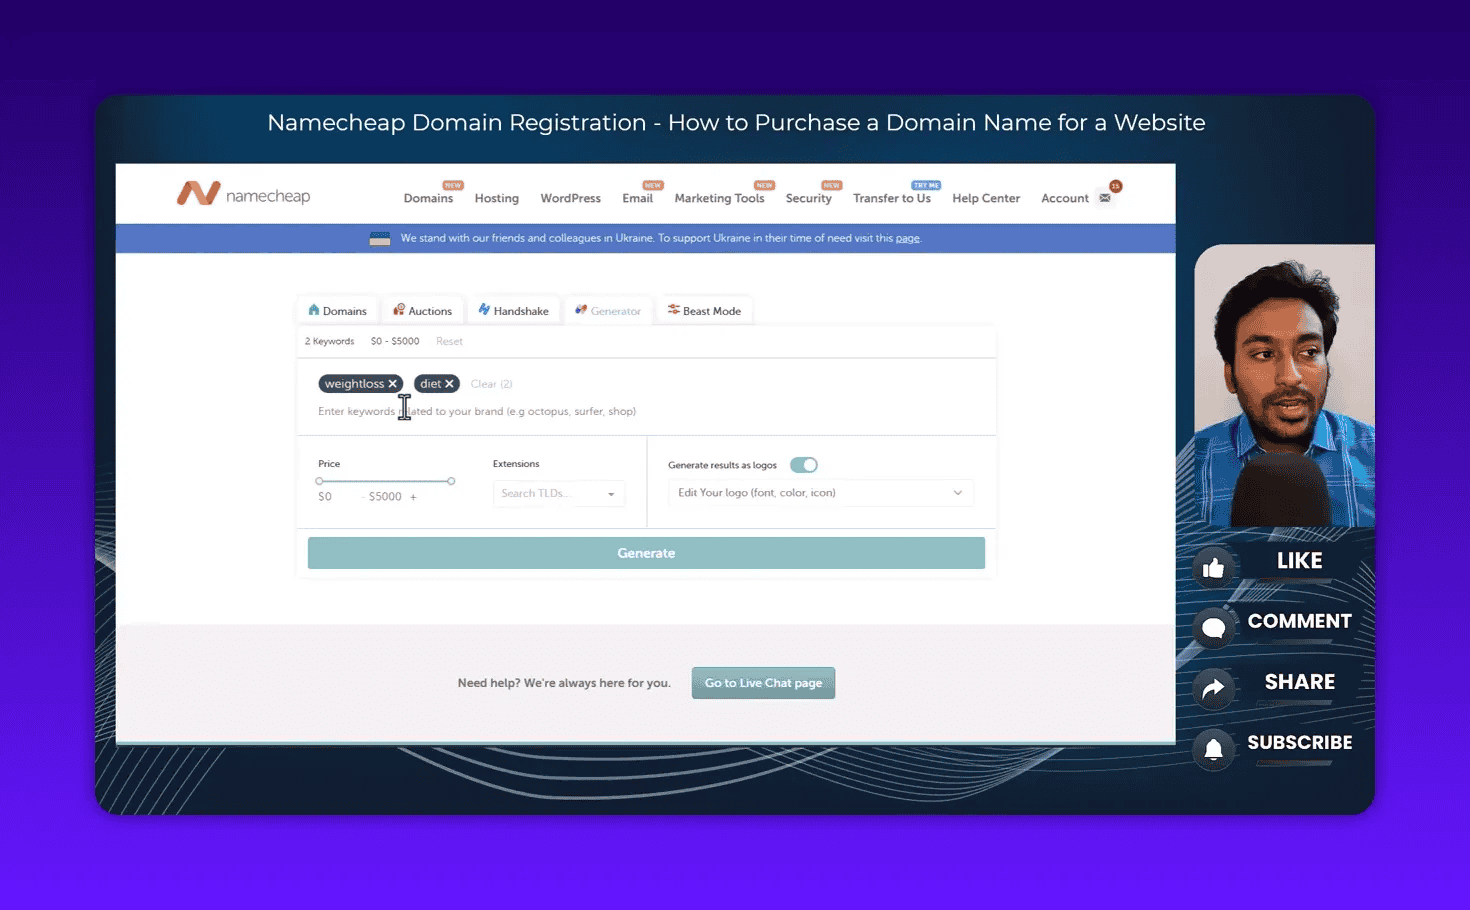
Here is how it works:
- Enter two or three keywords related to your business or niche (for example, “diet plan” or “digital marketing”)
- Set your maximum price budget using the price slider
- Select which extensions you want to see results for
- Toggle whether you want AI to generate a logo concept alongside the domain suggestions
- Click Generate Now
The generator combines your keywords with various word patterns (prefixes, suffixes, abbreviations) to suggest available domain names you might not have considered. It also shows a logo mockup for each suggestion so you can visualize how the brand name might look.
This is particularly useful if you are in the early stages of naming a business or project and want to see your options before committing to a name. The suggestions are not always perfect, but they can spark ideas you would not have found by typing random searches.
Step 7: Use Beast Mode for Bulk Domain Checking
Beast Mode is Namecheap’s bulk domain availability checker, and it is genuinely one of the most useful features for anyone doing serious domain research.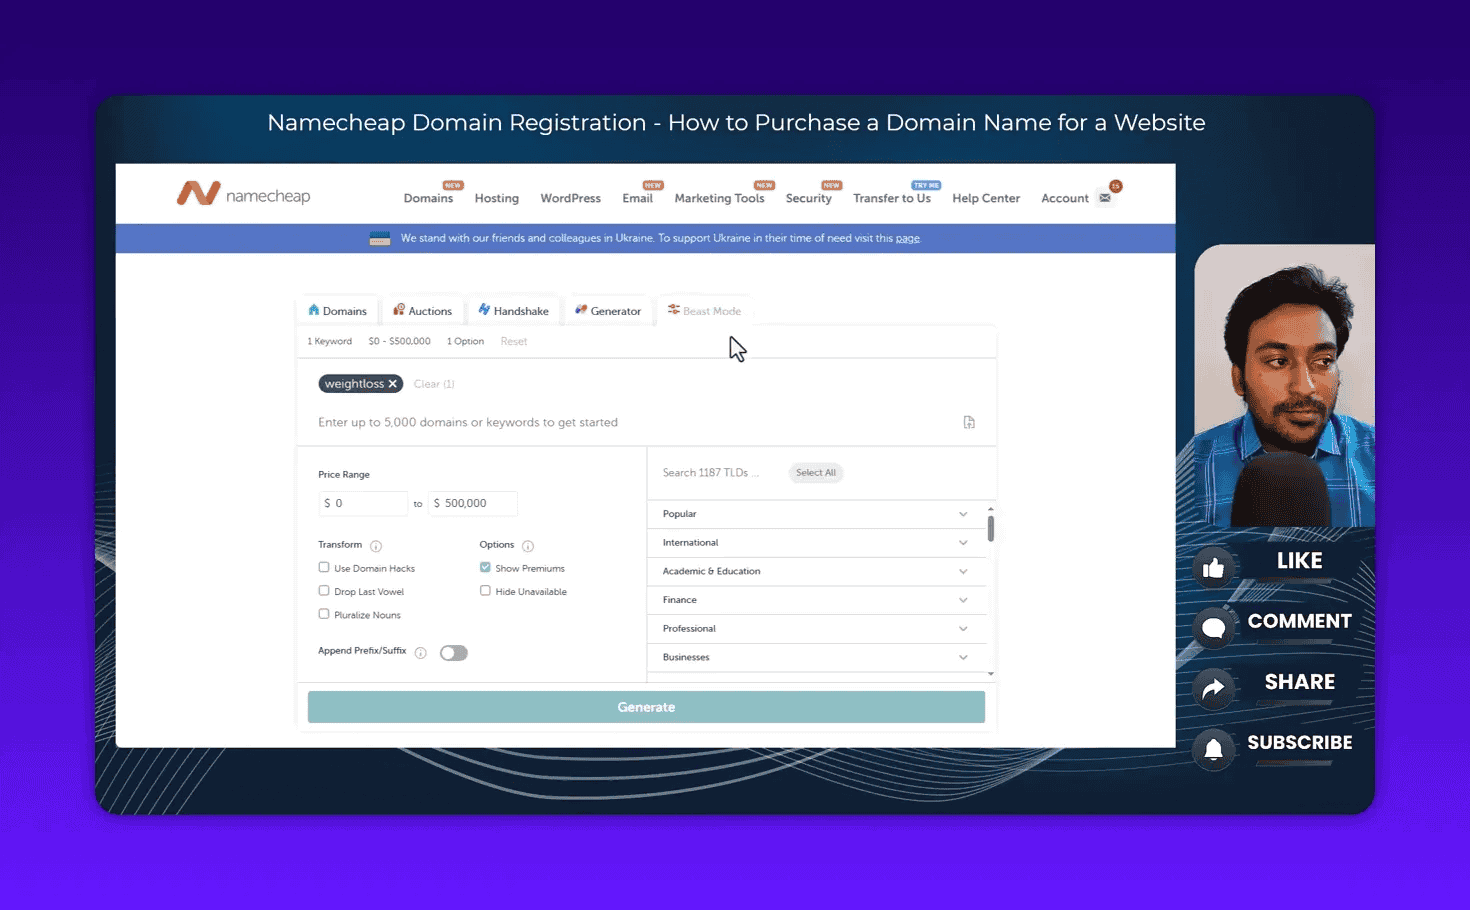
Here is what Beast Mode does differently from standard search:
Standard search checks one domain name at a time. Beast Mode checks up to 5,000 domain names simultaneously.
How to use it:
- Prepare a list of domain name ideas. You can do this manually or use a tool like ChatGPT to generate 100 variations on a theme.
- Paste the entire list into Beast Mode (or upload a CSV file if you have a large batch)
- Set your price range filter
- Choose which extensions to check
- Click Generate
Beast Mode also has a Transforms feature. This takes your input list and automatically generates variations: pluralizing nouns, removing vowels, adding popular prefixes or suffixes. This multiplies your options significantly.
The output shows which names are available, at what price, and on which extension. You can filter to show only available domains, remove premium results, and sort by price. For anyone registering multiple domains for a portfolio or checking options for a new project, this saves hours of manual searching.
Step 8: Add to Cart and Deal With the Upsells
Once you have found the domain you want, click Add to Cart. This is where Namecheap (like every domain registrar) presents add-ons designed to increase your order value.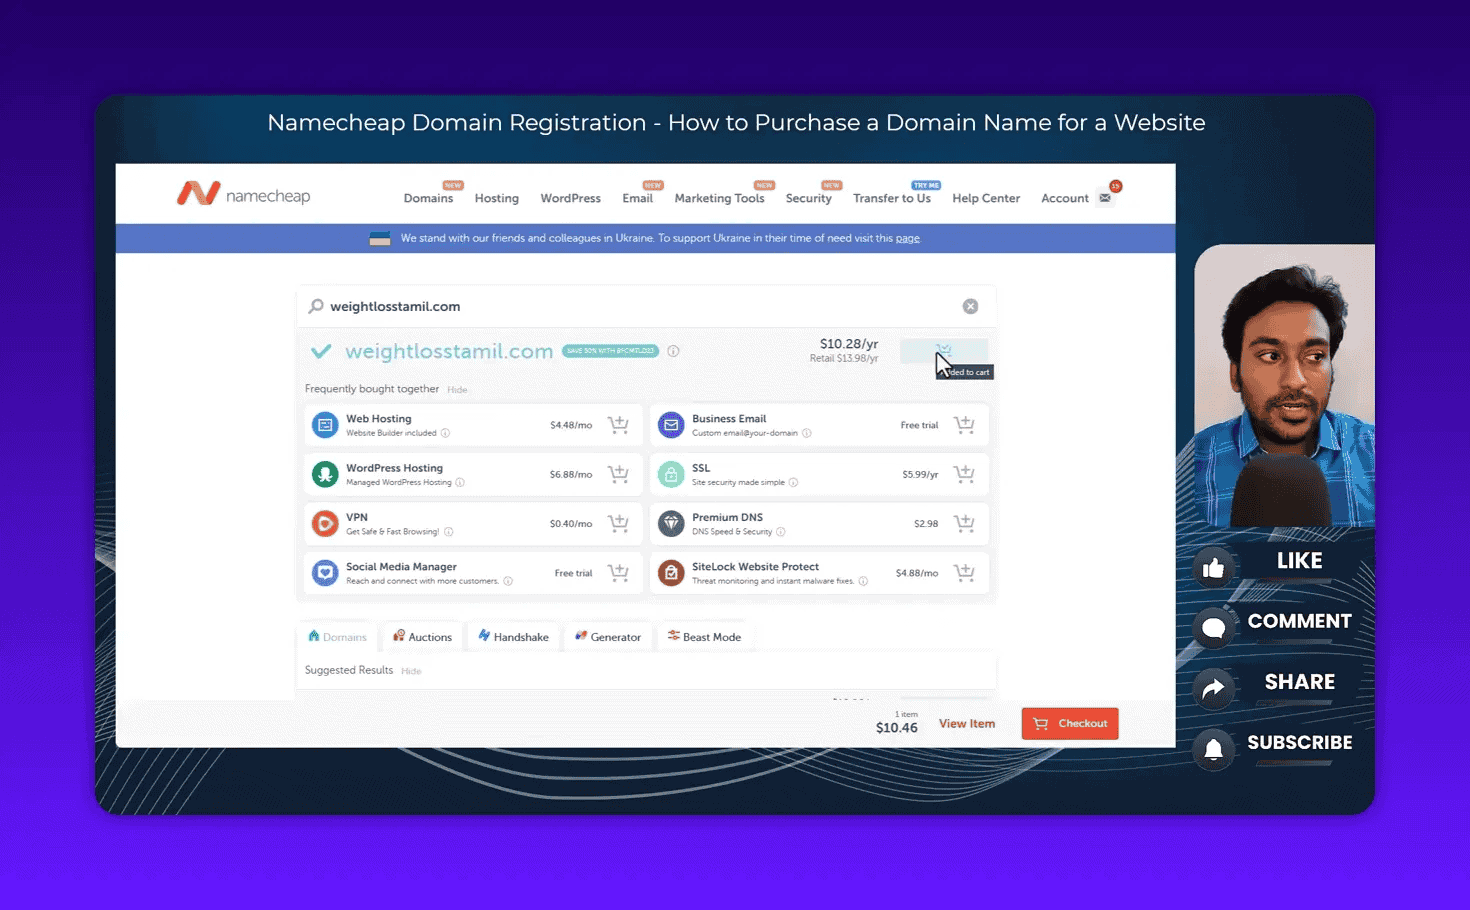
The upsells you will see include:
- Web hosting packages
- SSL certificates
- Business email hosting
- Site builder subscriptions
- VPN or other security products
Most of these are not things you need right now. Some of them have a particularly sneaky setup: Namecheap sometimes offers “1 month free” web hosting, which automatically rolls into a paid monthly subscription after the trial ends.
My strong recommendation: review every item in your cart before proceeding. If you see a hosting trial or any service you did not intentionally add, click Delete to remove it. You can always come back for these services later if you need them. Do not let a free trial become a recurring charge you forgot to cancel.
The only add-on that is already included at no extra cost is WHOIS Privacy Protection. This hides your personal contact details from the public domain registry. Namecheap includes this for free on eligible domains. You do not need to add or pay for it separately.
Once your cart contains only what you actually want, proceed to Checkout.
Step 9: Apply a Promo Code Before You Pay
On the checkout page, look for the Promo Code field. This is worth using. Namecheap runs frequent discount promotions, and even a small discount adds up when you are buying multiple domains.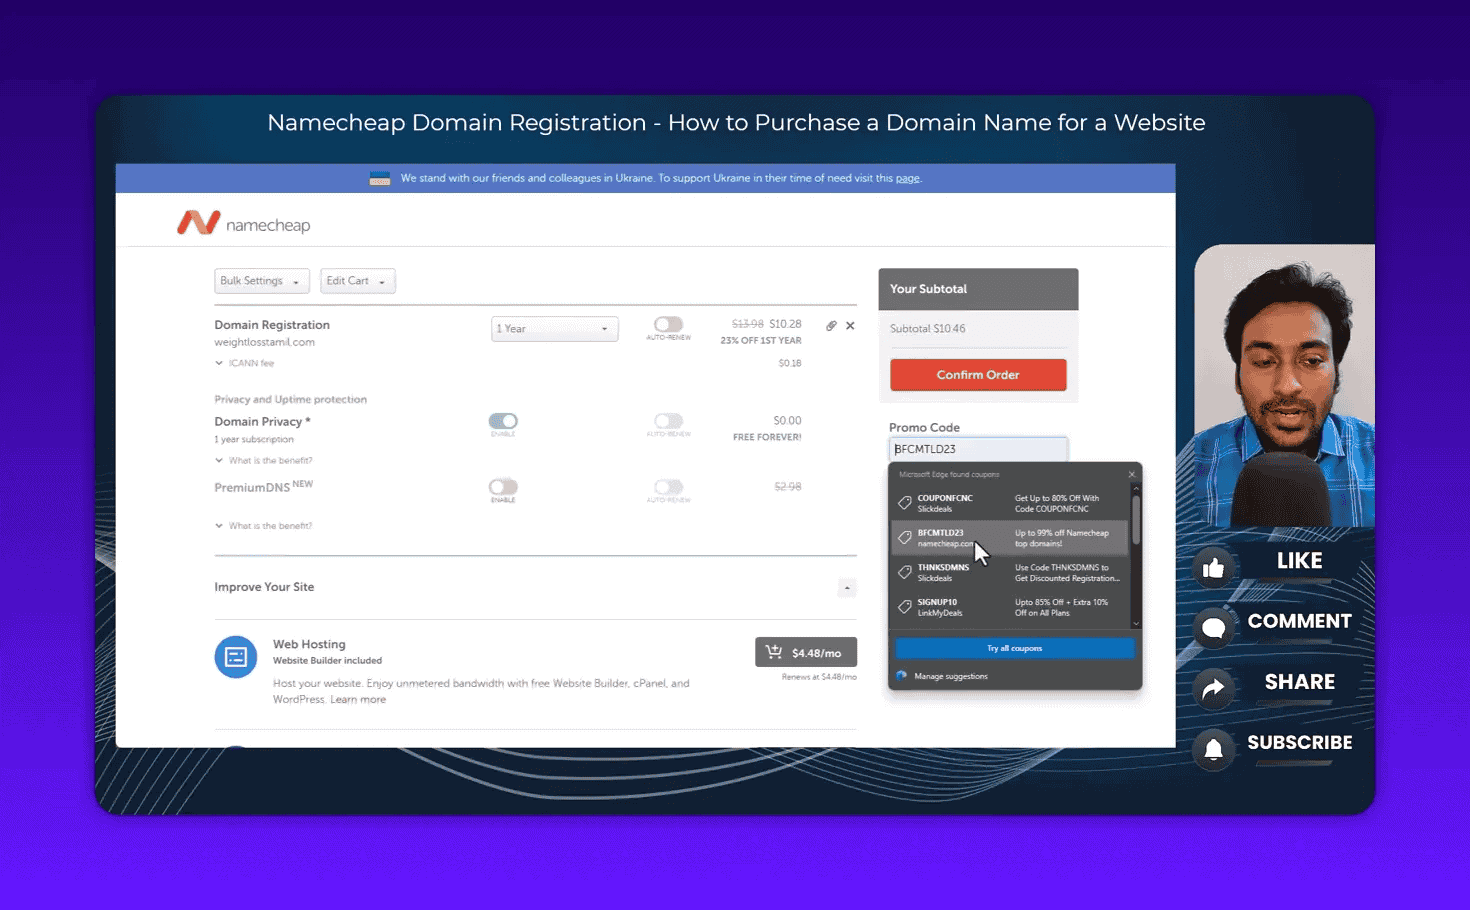
A few ways to find valid Namecheap promo codes:
- Check the Namecheap promotions page directly
- Look in the description of my YouTube video for current affiliate/discount links
- Microsoft Edge’s browser has a built-in Coupons feature that sometimes automatically surfaces valid Namecheap promo codes
When I bought ten domains recently during a sale, a promo code dropped my.com registration from $13.90 to $7.16 including the ICANN fee. That is roughly a 48% discount. Worth the 30 seconds it takes to find a code.
After applying a promo code, the checkout page shows you the adjusted pricing clearly:
- First-year discounted price
- Regular renewal price (what you pay from year two onwards)
- ICANN fee (a mandatory regulatory fee, not a Namecheap charge)
- Free WHOIS Privacy Protection
Review this carefully before confirming. The first-year price and renewal price are often different. Your $7 domain might renew at $14 or $15 the following year. This is normal across all registrars. It is not hidden. It is displayed right there on the checkout page. Read it so you are not surprised at renewal time.
Step 10: Choose Your Payment Method and Complete the Purchase
Namecheap supports several payment methods:
- Debit or credit card
- PayPal
- Bitcoin and select cryptocurrencies
- Namecheap account balance (you can pre-load funds into your account)
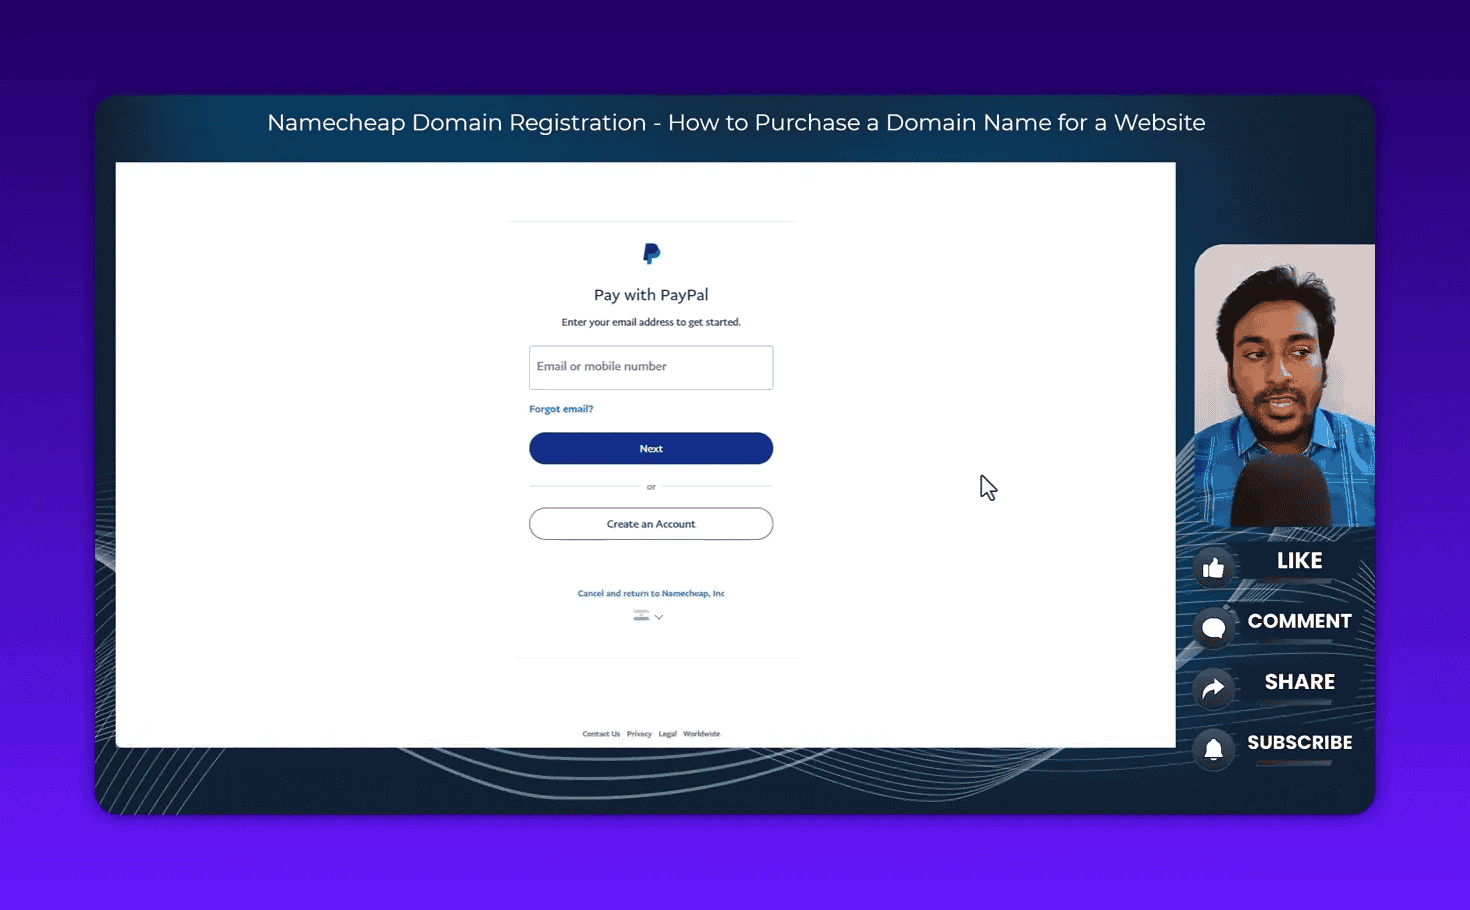
I use PayPal for most of my domain purchases because it is fast and I do not need to re-enter card details. If you manage multiple domains for clients, loading account balance in advance is a convenient option since you can buy domains instantly without going through a payment processor each time.
Before completing the purchase, the checkout page also asks you to confirm your auto-renewal preference. If you enable auto-renewal, Namecheap automatically charges your saved payment method when the domain is about to expire each year. If you disable it, you need to manually renew before the expiry date or risk losing the domain.
For a site you are actively building and care about, I recommend enabling auto-renewal. The last thing you want is to forget a renewal date, let the domain expire, and have someone else register it or have it go to auction.
Once you confirm the payment (for PayPal, this redirects you to the PayPal login page), Namecheap processes the order within a few seconds. You will see an Order Confirmed screen with your order ID, payment details, and the domain you purchased.
What Happens After You Buy a Domain?
After your purchase is confirmed, you will see a Next Steps screen with options for what to do with your new domain.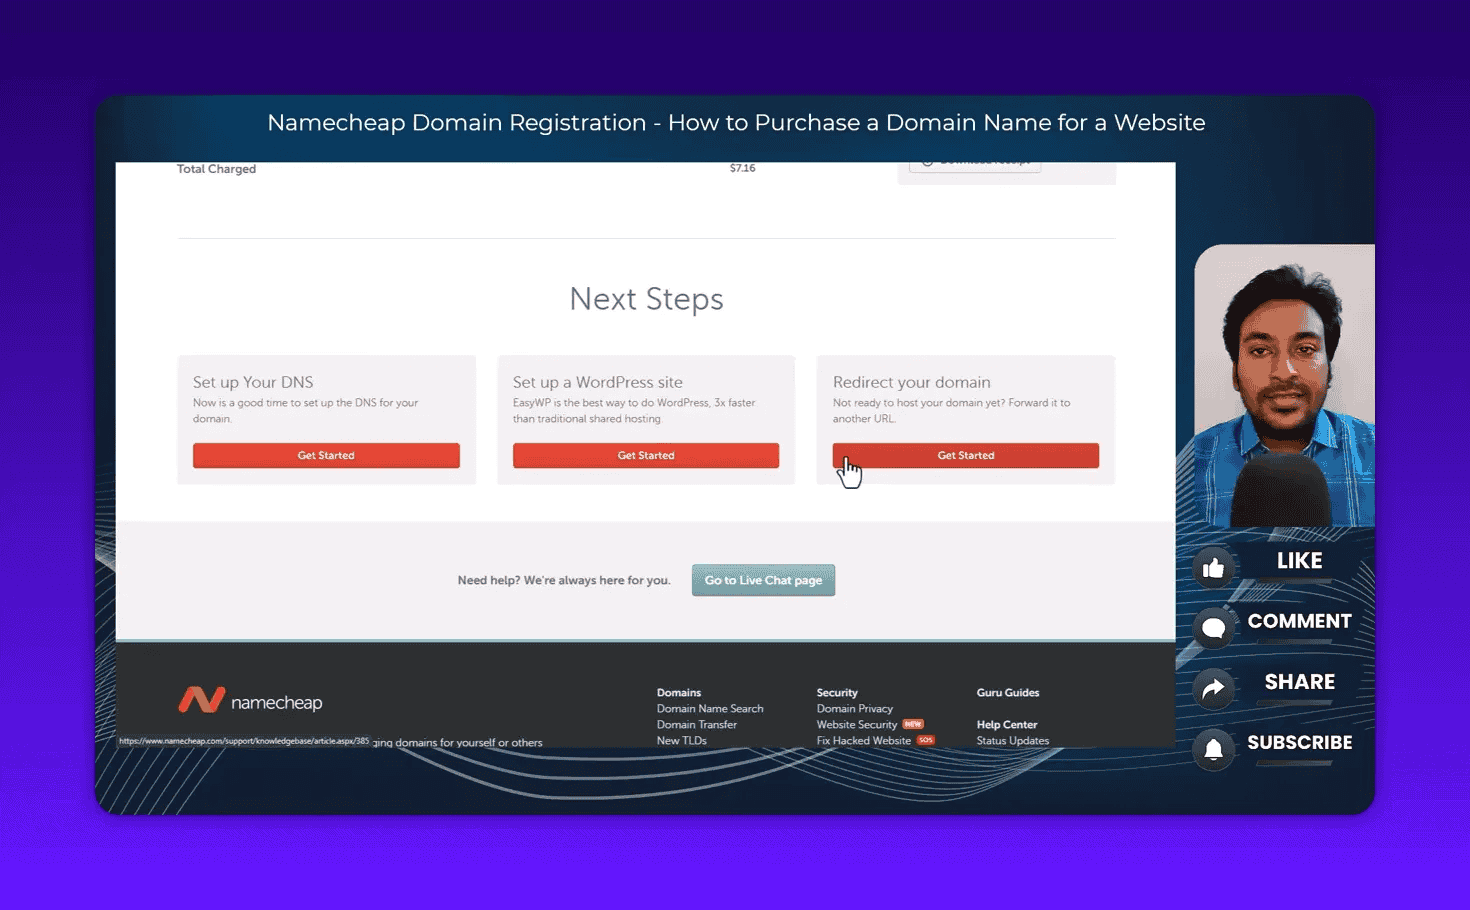
At this stage, the most common next steps are:
Connect the domain to web hosting. If you have a hosting account elsewhere (SiteGround, Cloudways, Hostinger, etc.), you update the nameservers in your Namecheap account to point to your hosting provider. This tells the internet where to find your website.
Set up branded email. If you want an email address like hello@yourdomain.com, you need to configure email hosting. One free option I use is Cloudflare Email Routing, which lets you receive emails at a custom domain address and forward them to your existing inbox at no cost. I wrote a full guide on setting up branded email with Cloudflare.
Start building your website. If you need a WordPress site set up quickly, I reviewed StellarSites which is an AI-powered WordPress builder that can have a professional site live in minutes.
Do nothing for now. If you are just securing the domain name to prevent someone else from registering it, you can park it and come back when you are ready to build.
The domain is registered for one year from the purchase date. You will receive a renewal notice by email before it expires. Make sure your Namecheap email address is one you actively monitor.
Common Mistakes First-Time Domain Buyers Make
I have watched hundreds of students in my community make the same avoidable mistakes. Here are the ones to watch for:
Registering a domain with a typo. As I mentioned above, Namecheap does not offer refunds for misspelled domains. Spell out every character before you click Add to Cart.
Buying from the wrong domain in search results. When you search for yourbrand.com, the results page shows both available domains and similar premium/variant options. Make sure you are adding exactly the domain you searched for, not a suggested premium alternative that looks similar but costs $500.
Forgetting to remove the hosting trial upsell. The “1 month free” web hosting offer gets a lot of people. After the free month, it auto-bills. Remove it unless you genuinely want Namecheap hosting.
Not enabling WHOIS privacy. This is free on Namecheap for eligible domains. Make sure it is shown as included in your order. Without it, your name, address, and phone number are publicly visible in the WHOIS database to anyone who looks up your domain.
Skipping auto-renewal. If you are building a real business around a domain name, auto-renewal protects you from losing it. Enable it and keep your payment method up to date.
Not comparing prices across registrars. Namecheap is competitive, but prices vary by extension. For some country-code domains or specialty extensions, another registrar might be cheaper. Always check before buying.
Is Namecheap the Right Registrar for You?
For most people buying their first domain, yes. Namecheap hits the right combination of price, features, and ease of use. The free WHOIS privacy, the clean dashboard, and the reasonable pricing are genuinely hard to beat at the standard domain level.
If you want to compare Namecheap against Porkbun, Cloudflare Registrar, GoDaddy, and other popular options, I polled 250+ community members on which registrar they actually use and trust. Read the full domain registrar comparison here.
Getting your domain name right is the first technical step in building an online presence. Once you have it, the next priority is understanding how search engines will find and evaluate your new site. My guide on SEO fundamentals for business owners is a good place to start after your domain is set up.
Frequently Asked Questions
How much does a domain name cost on Namecheap?
A standard.com domain costs between $9 and $14 per year at regular pricing on Namecheap. With a promo code or during a sale, first-year prices can drop to $5 to $7. Renewal prices after the first year are typically in the $13 to $15 range. Specialty extensions vary widely, from under $2 per year to hundreds of dollars per year.
Is Namecheap safe and legitimate?
Yes. Namecheap is one of the largest domain registrars in the world with millions of domains under management. They are ICANN-accredited (the regulatory body that oversees domain registration) and have been operating since 2000. They have a solid reputation for customer support and transparent pricing.
What is the difference between a domain name and web hosting?
A domain name is your web address (for example, yourbrand.com). Web hosting is the server where your website files are stored. You need both to have a live website. You can buy them from the same company or from different companies. Namecheap offers both, but you are not required to use their hosting when you buy a domain from them.
Can I transfer a domain away from Namecheap later?
Yes. You can transfer your domain to any ICANN-accredited registrar at any time after 60 days from the initial registration date. The transfer process involves unlocking your domain in Namecheap’s dashboard and requesting an authorization code (EPP code) to provide to the new registrar.
What is WHOIS privacy and do I need it?
WHOIS privacy hides your personal contact details (name, address, phone, email) from the public WHOIS database, which anyone can query to find out who owns a domain. Without it, your personal information is publicly visible. Namecheap includes WHOIS privacy protection for free on eligible domains. I always enable it.
Does the domain name affect my SEO?
Minimally. Having a keyword in your domain name is not a significant ranking factor in 2026. Google has confirmed that exact-match domains do not receive special treatment. What matters for SEO is the quality of your content, your site’s technical health, your backlink profile, and your topical authority. If you want to understand what actually moves rankings, read my guide on what SEO is and how it works for business.
What is the ICANN fee on my Namecheap order?
The ICANN fee is a small mandatory charge ($0.18 for most generic TLDs) collected by all domain registrars on behalf of ICANN, the Internet Corporation for Assigned Names and Numbers. Every registrar charges this. It is not a Namecheap-specific fee and is not negotiable.
Final Thoughts
Buying a domain on Namecheap is genuinely straightforward once you know what to expect. Create your account first. Search carefully. Triple-check your spelling. Remove the upsells. Apply a promo code. Pay and confirm.
The entire process takes under ten minutes for someone doing it for the first time.
The more important question is what you do with the domain after you buy it. A domain name sitting unused is just an annual cost with no return. If you are registering a domain to build a website around it, commit to understanding SEO from the start. Getting the technical and content foundations right from day one saves you from expensive fixes later.
If you are new to SEO and want a clear starting point, my SEO fundamentals guide for business owners walks you through the five core stages of SEO in plain language, designed for people who are building their first site without agency support.