TL;DR: To install Windows Server on Hetzner, create a Hetzner Cloud account (you get EUR 20 free credit), spin up a Linux VPS, mount the Windows ISO, boot through the console, load VirtIO drivers for storage and ethernet, complete the install, enable Remote Desktop, and connect from your local machine. The whole process takes about 30 minutes.
Most cloud providers will not let you run Windows Server on a VPS without paying extra for a Windows license. Hetzner is different. You can upload your own Windows ISO and install it directly on their cloud infrastructure for the same low monthly price as a Linux VPS, starting at around EUR 5 per month.
I recorded a full walkthrough on my YouTube channel covering every single step, from creating the Hetzner account through connecting via Remote Desktop. This written guide follows the same structure so you can use both together.
If you do not have a Hetzner account yet, use my referral link and you will get EUR 20 in free credits applied to your account. That is enough to run the cheapest server for several months for free.
What You Need Before You Start
Before jumping in, check that you have these ready:
- A credit or debit card. Hetzner asks for payment details even when using free credits. They do a small validation transaction to confirm the card is real. This protects them against mass fake account creation.
- A Windows Server ISO. Hetzner provides these directly in the control panel. You do not need to find one elsewhere.
- A computer running Windows, macOS, or Linux with Remote Desktop client installed. On Windows, it comes pre-installed. On macOS, use Microsoft Remote Desktop from the App Store. On Linux, use Remmina.
- An email address you have access to for account verification.
That is it. No technical background needed.
Step 1: Create Your Hetzner Cloud Account
Go to Hetzner Cloud and click Register now.

Enter your email address and a strong password. Click Continue.
Hetzner will send a verification email. Click the link in that email to confirm your address. Once confirmed, the page will say verification is complete and ask you to fill out your personal and contact details.
Fill in your name, address, and contact information accurately. Hetzner uses this for invoice purposes. Inaccurate details can cause issues with account verification later.
When prompted to select a currency, choose carefully. This cannot be changed later. I kept mine in Euros.
Step 2: Add Payment Method and Verify Account
After setting up your profile, Hetzner asks you to connect a payment method.

Enter your credit or debit card details and click Save. Hetzner runs a small test transaction to validate the card. This is standard practice across cloud providers. Once validated, you will see a confirmation that the payment method has been added.
For some new accounts, especially in certain countries, Hetzner may flag the account for manual review. If this happens, go to the Verification section of your account and upload the document they request. I went through manual verification myself when testing from my location. It took a short time to complete via a direct message with their support.
Step 3: Enable Two-Factor Authentication
After the payment is added, Hetzner offers you the option to enable two-factor authentication (2FA). I recommend enabling it. Your VPS will have a public IP address, and your account is the only thing protecting it.
Click Enable two-factor authentication and follow the prompts. If you prefer to skip this for now, you can set it up later under account settings. Click Skip if you want to continue without it.
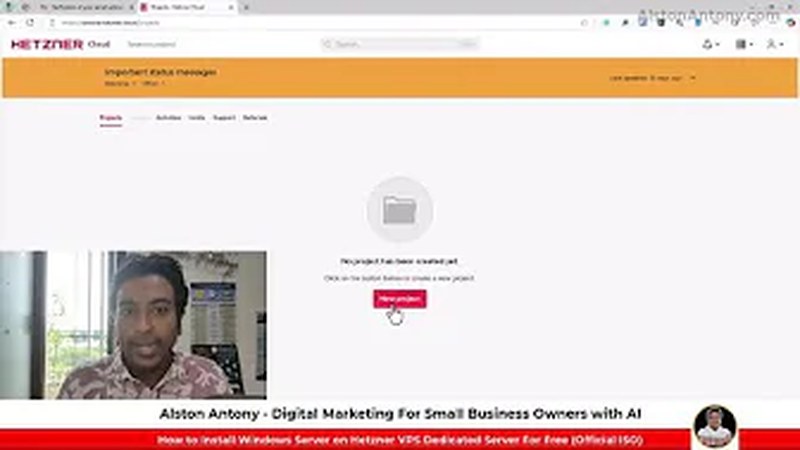
Step 4: Create a New Project
Once your account is set up and verified, you land on the Hetzner Cloud dashboard.
Click Create a new project and give it a name. I used something like “Windows Server” to keep it easy to identify if I have multiple projects running. Click the project name to enter it.
Inside the project, click Servers in the left sidebar. You will see an empty list with an Add Server button.
Step 5: Create the VPS Server
Click Add Server and configure your new server.
Location: Select the region closest to your users or yourself. Different locations have slightly different pricing. Pick what makes sense for your use case.
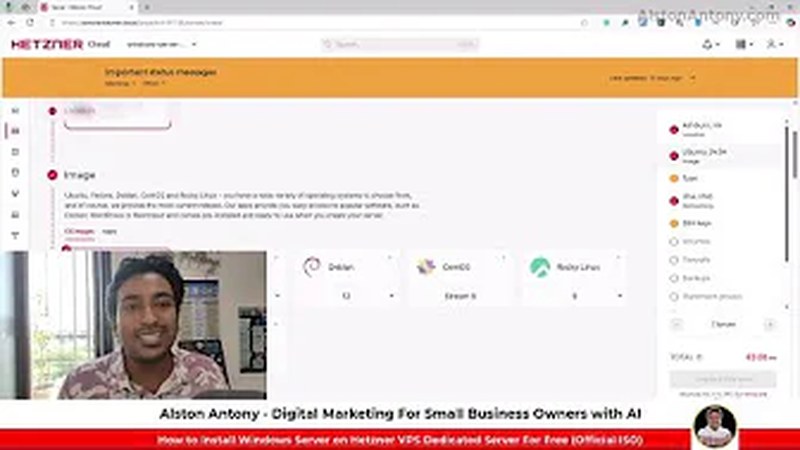
Operating System: Leave this set to Ubuntu. Do not select Windows. You are going to replace the OS manually using a Windows ISO later. Ubuntu is needed as a starting point because Hetzner does not offer native Windows installation through the standard server creation flow.
Architecture: Select x86 (Intel/AMD). This is the standard option and the one required for Windows Server.
Server Type: For most use cases, the lowest shared vCPU tier works fine to get started. The entry level gives you 2 shared vCPUs, 2 GB RAM, 40 GB SSD storage, and 1 TB of monthly bandwidth for around EUR 5 per month. You can scale up later if needed.
Leave all other options (SSH keys, firewalls, backups) at their defaults for now. You can add them later.
Adjust the server name if you want, then click Create and Buy. Hetzner will provision the server in about 30 seconds. You will see real-time notifications as it creates the IP address, sets up storage, and boots the server.
Step 6: Disable Auto-Resize
Once the server is created, click on it to open its details page.
Find the Rescale option in the left sidebar or under server settings. By default, Hetzner may have auto-rescaling enabled. This means the server could automatically resize to a more expensive plan if it hits resource limits.
Turn this off unless you specifically want automatic scaling. Click Rescale and uncheck the auto-resize option. This keeps your costs predictable.
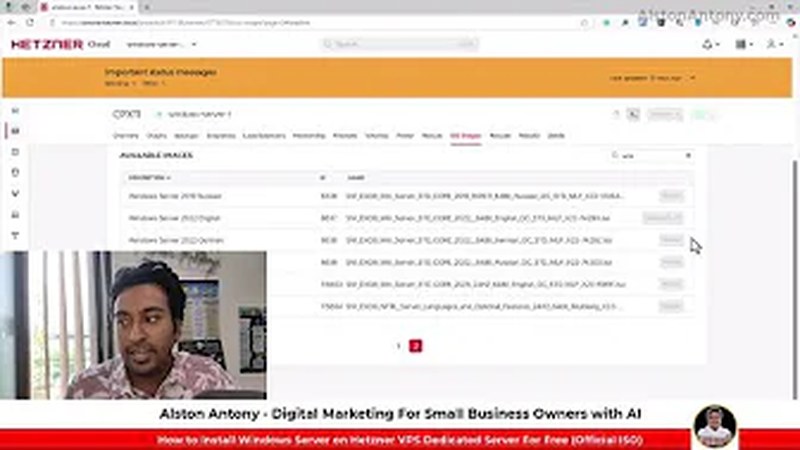
Step 7: Mount the Windows Server ISO
Now you need to attach a Windows Server ISO to the server so you can boot from it.
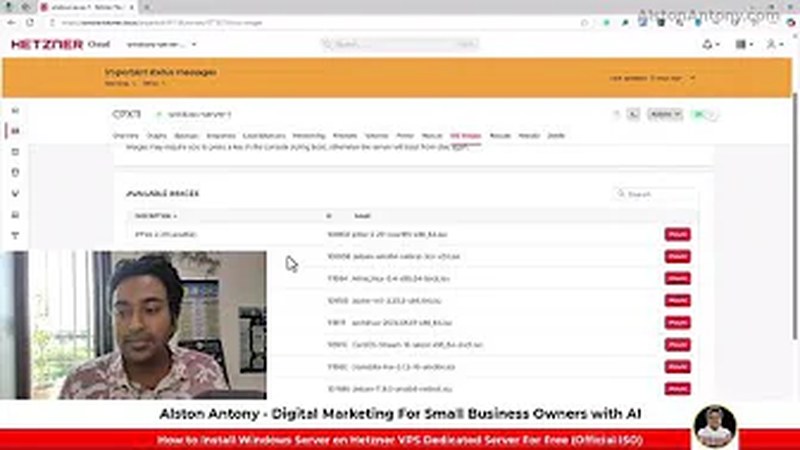
In your server’s detail page, look for the ISO Images section (sometimes under the Rescue or ISO tab depending on the Hetzner UI version). Click it.
Search for Windows in the ISO search box. You will see a list of available Windows Server versions:
- Windows Server 2016 (English)
- Windows Server 2019 (English)
- Windows Server 2022 (English)
- Windows Server 2025 (English)
- Various non-English editions
Select the version you want. I used Windows Server 2022 English for this tutorial. Click Mount next to your chosen ISO. The button will change to Unmount, confirming the ISO is now attached.
Step 8: Boot Into Windows Setup via Console
With the ISO mounted, you need to restart the server so it boots from the ISO.
Back in the server overview, find the Power options and select Power off, then Power on to trigger a cold boot. Alternatively, send a reset command.
Now click Console to open the server’s graphical console in your browser.
Inside the console, click GUI mode to enable graphical input. Then send a Ctrl+Alt+Delete signal using the console toolbar button. This will display the Windows setup screen.
You will see the standard Windows Server installation wizard. Click Next on the language selection screen, then click Install now.
Selecting the Windows Edition:
When prompted to choose an edition, select Windows Server 2022 Standard Evaluation (Desktop Experience) or the equivalent for your chosen version.
The “Desktop Experience” option is important. Without it, you get a server core installation with no graphical interface, which makes initial configuration much harder and Remote Desktop less reliable. Always choose Desktop Experience for a VPS you plan to use day-to-day.
Accept the license terms and click Next.
Step 9: Load the VirtIO Hard Disk Driver
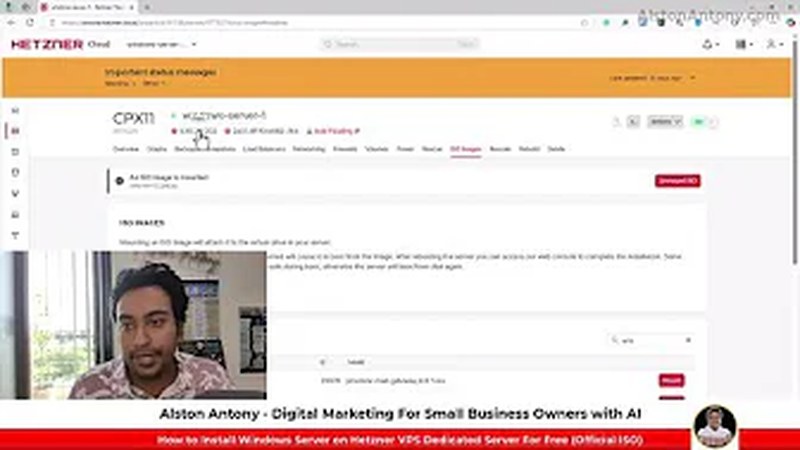
When you reach the disk selection screen, the installer will show zero available drives. This is expected. Hetzner VPS storage uses VirtIO drivers, which Windows Server does not include by default.
To fix this, you need to temporarily swap ISOs.
Go back to your server’s ISO Images section in the Hetzner dashboard (keep the console open in another tab). Unmount the Windows ISO and search for Windows driver or VirtIO. Select the latest VirtIO driver ISO and click Mount.
Now back in the Windows installer console, click Load driver, then Browse.
You will see the VirtIO driver ISO loaded as a CD drive. Navigate through the folders:
- Open the VirtIO ISO drive
- Find the folder named VIOSTOR (this is the VirtIO storage driver)
- Expand it and select the folder matching your Windows version. For Windows Server 2022, that is w2k22. For 2019, it is w2k19, and for 2016, w2k16.
- Select the subfolder (usually amd64)
- Click OK
The installer will find the VirtIO storage driver automatically. Click Next to install it.
Once the driver is loaded, the installer should now show your server’s disk in the list. You may also see additional drivers appear in the list (not just storage). Select the storage driver and continue.
Remount the Windows ISO:
Before proceeding, swap back to the Windows Server ISO. Go to ISO Images in the Hetzner dashboard, unmount the VirtIO ISO, and remount your Windows Server ISO (2022 English or whichever version you chose).
The installation wizard should automatically refresh and show your disk.
Step 10: Partition and Install
Select the unallocated disk space and click New to create a partition. You can use the full disk size for a single partition, which is the simplest setup. Windows will automatically create a small system reserved partition alongside your main partition.
Click Next and wait. Windows Server installation takes 5 to 15 minutes depending on server speed. The console will show progress. Do not close it.
When installation completes, the server will reboot. You will see a screen asking you to set the Administrator password. Enter a strong password and confirm it. Write it down somewhere safe.
Step 11: Configure Windows Server Settings
After logging in for the first time through the console, Server Manager opens automatically. There are a few settings to configure before you can use Remote Desktop.
Disable Internet Explorer Enhanced Security Configuration:
In Server Manager, click Local Server in the left sidebar. Find IE Enhanced Security Configuration and click On next to it. A popup appears with options for Administrators and Users. Set both to Off and click OK.
This prevents Internet Explorer from blocking web pages during initial setup. You will likely want to install a real browser anyway (Chrome or Firefox) once connected.
Enable Remote Desktop:
Still in Local Server, find Remote Desktop and click Disabled.
In the System Properties dialog that opens, select Allow remote connections to this computer. Click Apply, then OK.
You may see the setting still showing as Disabled briefly after saving. This is a display refresh issue. Click back to Server Manager’s main screen and return to Local Server. It should now show as Enabled.
Step 12: Install Network Drivers via VirtIO
You have Remote Desktop enabled now, but there is still no internet connection inside Windows. The VirtIO ethernet driver is missing.
Go back to Hetzner’s ISO Images and mount the VirtIO driver ISO again.
Inside Windows, open Device Manager. You can find it by typing “device” in the Start search bar.
Device Manager will show several devices with yellow warning icons. These are missing drivers. For each one, right-click and select Update driver, then Browse my computer for drivers.
Click Browse and select the root of the VirtIO CD drive. Check the box that says Include subfolders and click Next. Windows will automatically find and install the matching driver from the ISO.
Repeat this for each device showing a warning, especially:
- Ethernet Controller (gives you network access)
- PCI Device (simple communications controller)
- Any other unrecognized devices
After installing the ethernet driver, your network adapter should show as connected. You can verify by opening the browser and navigating to a website.
Step 13: Connect via Remote Desktop
You are ready to connect from your local computer. Close the browser console.
Find your server’s IP address: In the Hetzner dashboard, go to your server’s detail page. The public IPv4 address is displayed prominently.
On Windows: Open Remote Desktop Connection (search for “mstsc” or “Remote Desktop” in Start). Enter the server’s IP address. When prompted for credentials, enter:
- Username:
Administrator - Password: the password you set during installation
Click Connect. You will get a certificate warning since the server uses a self-signed certificate. Click Yes to proceed. This warning will not appear on future connections if you check the “Don’t ask me again” box.
On macOS: Open Microsoft Remote Desktop, click the + button, and add a new PC. Enter the IP address. Add your credentials and connect.
Once connected, you are looking at your Windows Server desktop through Remote Desktop. The connection is noticeably faster than the browser console.
One last recommended step: go to Windows Update Settings and install any available updates. A freshly installed Windows Server will have several security patches to apply. This is not mandatory to get started, but it is good practice before deploying anything to this server.
Common Mistakes to Avoid
Skipping the VirtIO driver step: The most common reason the installation fails is selecting Windows edition and hitting the disk selection screen with no drives listed, then not knowing what to do. You must load the VirtIO storage driver before the installer can see the disk.
Choosing the wrong Windows edition: Do not install Server Core unless you specifically need it and know how to manage a headless Windows server. Always pick Desktop Experience for initial setups.
Not disabling auto-resize: If you leave auto-resize on, Hetzner may upscale your server during a resource spike and your monthly bill will increase unexpectedly.
Closing the console before the password step: After installation completes, Windows reboots and waits for you to set the Administrator password. If you close the console thinking it is done, you will need to reopen it to complete setup.
Forgetting to swap ISOs back: The hardest part of this whole process is remembering to unmount the VirtIO ISO and remount the Windows ISO after loading the storage driver. If you skip this, the installer will try to install from the VirtIO ISO, which does not make sense.
Why Use Hetzner for a Windows VPS?
Hetzner is one of the cheapest cloud providers in Europe with solid uptime and a clean control panel. Most providers charge an extra Windows licensing fee on top of the server cost. With Hetzner, since you are using your own ISO (Hetzner provides these for free), there is no additional OS fee.
The EUR 20 free credit means you can run this server for three to four months at the lowest tier without spending a cent. That makes it a practical choice for anyone who needs a Windows environment in the cloud for SEO tools, automation scripts, running Screaming Frog or other desktop SEO software, or remote access to a Windows environment from a non-Windows machine.
If you want to compare Hetzner against other VPS options, check my list of best SEO tools where I cover tools for running SEO workflows at scale, including what server setups work best.
For anything related to running automated SEO research or data collection on your VPS, see how to set up a Windows Server on Hetzner for SEO and the guide on using SEO tools that run better on Windows.
Frequently Asked Questions
Is Hetzner free to use?
Hetzner is not free, but they offer EUR 20 in trial credits to new accounts through their referral program. At the entry-level server tier (around EUR 5 per month), that covers your first three to four months at no cost. You do need a valid credit or debit card on file even during the free credits period.
Which Windows Server version should I install on Hetzner?
For most users, Windows Server 2022 is the recommended choice. It has the longest support window among currently available versions and includes the latest security features. If you have a specific application requiring an older version (2019 or 2016), those are available too. Windows Server 2025 is also listed but still relatively new.
Do I need to buy a Windows Server license for Hetzner?
The ISOs Hetzner provides include evaluation licenses that are valid for 180 days. For production long-term use, you should activate Windows with a proper license. For testing, development, or short-term projects, the evaluation period gives you plenty of time. Microsoft’s Volume Licensing or Azure Hybrid Benefit can be used if you have existing Windows Server licenses.
Why can’t I see any drives during Windows installation?
Hetzner uses VirtIO storage drivers, which are not included in Windows Server by default. The installer cannot see the disk until you load the VirtIO SCSI storage driver from the VirtIO driver ISO. Refer to Step 9 in this guide for the exact process.
How do I connect to my Hetzner Windows VPS from a Mac?
Download Microsoft Remote Desktop from the Mac App Store. It is free. Once installed, click +, add a new PC, enter the server’s IP address, and connect with your Administrator credentials. The experience is nearly identical to using RDP on Windows.
Can I install Windows Server 2025 on Hetzner?
Yes. Hetzner includes Windows Server 2025 in their ISO library. The installation process is identical to 2022. Select Windows Server 2025 when searching the ISO images and follow the same steps in this guide.
What to Do Next
You now have a running Windows Server VPS on Hetzner. Here are a few things worth doing immediately:
- Install Windows Updates via Settings to patch security vulnerabilities
- Install Chrome or Firefox for a real browser experience
- Configure Windows Firewall to restrict unnecessary inbound ports
- Change the Administrator password to something even stronger if you used a simple one during setup
- Enable automatic backups in the Hetzner dashboard (small additional cost, worth it)
If you are using this VPS specifically for SEO tools and automation, check out my guide on setting up automated SEO workflows on a Windows server and how I use Hetzner for running SEO research tools 24/7.
If you ran into any problems during setup, drop a comment on the YouTube video and I will help you troubleshoot.